Technical & On-Camera Skills Every YouTuber Must Develop
Estimated reading time: 12 minutes
Introduction
The YouTube landscape has transformed dramatically over the past decade. What once forgave shaky smartphone footage and inconsistent audio now demands a level of polish that separates successful channels from those struggling to gain traction. With over 500 hours of video uploaded to YouTube every minute, according to Statista, standing out requires more than compelling ideas—it demands mastery of both technical execution and on-camera performance.
The difference between a channel that stalls at a few hundred subscribers and one that scales to hundreds of thousands often comes down to production quality and presentation skills. Viewers have become sophisticated consumers of video content, and their expectations reflect the professional standards set by established creators and media companies.
This comprehensive guide breaks down the essential YouTube skills every creator must develop, from the technical fundamentals of lighting and audio to the nuanced art of on-camera presence. Whether you’re filming your first video or looking to elevate an existing channel, these skills form the foundation of sustainable growth on the platform.
Why Technical and On-Camera Skills Matter More Than Ever
The algorithmic mechanics of YouTube have evolved to prioritize viewer retention and engagement above nearly all other metrics. The platform’s recommendation system, as detailed in Google’s research on video discovery, analyzes how long viewers watch your content and whether they continue to engage with subsequent videos.
Poor technical quality directly impacts these critical metrics. Viewers abandon videos with:
- Inconsistent or harsh lighting that creates an unprofessional appearance
- Poor audio quality that forces them to strain to hear content
- Awkward framing that feels amateurish
- Uncomfortable on-camera presentation that disrupts the viewing experience
Research from content analytics platforms consistently shows that videos with professional production values maintain viewer attention 40-60% longer than those with technical shortcomings. This extended watch time compounds into better algorithmic performance, creating a virtuous cycle of growth.
Beyond algorithmic considerations, production quality establishes credibility. Viewers make split-second judgments about a creator’s expertise based on presentation. A financial advisor offering investment advice with poor lighting and echoing audio undermines their authority before speaking a single word. The medium becomes inseparable from the message.
Essential Technical Skills for YouTube Success
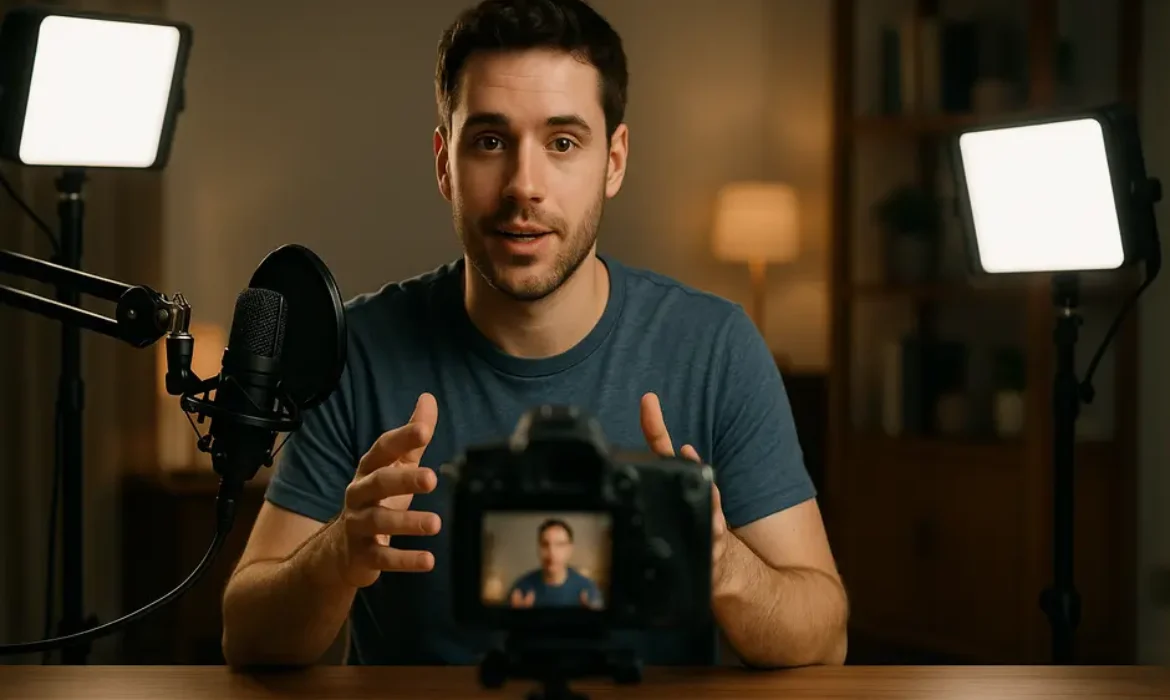
Lighting Setup and Control
Lighting represents the most cost-effective upgrade any creator can make to their production quality. Human vision compensates for poor lighting conditions automatically, but cameras capture exactly what they see—and poor lighting translates directly to poor image quality.
Three-Point Lighting Fundamentals
The classic three-point lighting system remains the gold standard for YouTube production:
| Light Type | Position | Purpose | Typical Settings |
|---|---|---|---|
| Key Light | 45° from subject, slightly elevated | Primary illumination, creates dimension | Brightest light, 50-75% power |
| Fill Light | Opposite side of key, lower intensity | Softens shadows, reduces contrast | 25-50% of key light intensity |
| Back Light | Behind subject, elevated | Separates subject from background | 75-100% power, narrow beam |
You don’t need expensive equipment to implement this approach. Budget-friendly LED panels from brands like Neewer or Godox provide adjustable color temperature and intensity for under $100 per light. Many successful creators start with natural window light as their key light, adding affordable fill lights to balance the exposure.
Color Temperature Consistency
One of the most overlooked aspects of lighting setup involves color temperature, measured in Kelvin. Mixing light sources with different color temperatures creates unnatural color casts that make footage look unprofessional.
- Daylight-balanced lighting: 5500-6500K (cool, blue-tinted)
- Tungsten/warm lighting: 3200-3500K (warm, orange-tinted)
Match all your light sources to the same color temperature range, then set your camera’s white balance accordingly. This simple adjustment dramatically improves the natural appearance of your footage.
Practical Lighting for Different Filming Scenarios
The lighting approach varies based on your content type:
- Talking head videos: Soft, diffused key light creates a flattering look without harsh shadows
- Product reviews: Overhead lighting plus fill light eliminates shadows that obscure details
- Vlogs: Continuous portable LED panels maintain consistent quality in varying locations
- Tutorial content: Bright, even lighting ensures viewers can see fine details clearly
Audio Quality and Microphone Techniques
Audio quality influences viewer retention more dramatically than video quality. Viewers will tolerate less-than-perfect visuals, but poor audio drives them away almost immediately. Your microphone investment deserves equal or greater priority than your camera choice.
Microphone Selection by Content Type
| Content Style | Recommended Mic Type | Key Advantages | Example Models |
|---|---|---|---|
| Stationary talking head | Large diaphragm condenser | Rich, broadcast-quality sound | Audio-Technica AT2020, Rode NT1 |
| Desk setup/gaming | Dynamic USB mic | Rejects background noise | Shure MV7, Rode PodMic |
| Movement/demonstrations | Lavalier (lapel) mic | Maintains consistent distance | Rode Wireless Go, Sennheiser XS |
| Vlog/mobile | Shotgun mic | Directional, camera-mounted | Rode VideoMic, Deity V-Mic |
Microphone Placement and Technique
Even premium microphones underperform with improper placement:
- Distance: Position the mic 6-12 inches from your mouth for most setups. Closer creates intimate sound but picks up mouth noises; farther reduces presence and increases room echo.
- Angle: Speak across the capsule rather than directly into it for condenser mics to reduce plosives (harsh “p” and “b” sounds).
- Height: Position at mouth level. Pointing a mic upward from a desk creates unnatural sound and picks up more room noise.
- Environment: Record in spaces with soft surfaces (curtains, carpet, upholstered furniture) that absorb sound reflections. Hard surfaces like bare walls and glass create echo that degrades audio quality.
Post-Production Audio Enhancement
Basic audio processing transforms good recordings into professional results:
- Noise reduction: Remove constant background noise (computer fans, air conditioning).
- Compression: Even out volume levels so quieter passages remain audible.
- EQ (equalization): Reduce low-frequency rumble, boost presence frequencies (2-5kHz).
- Limiting: Prevent distortion from occasional loud peaks.
Free tools like Audacity or built-in features in DaVinci Resolve provide these capabilities. The key is subtle application—over-processing creates artificial-sounding audio.
Camera Settings and Framing Fundamentals
Modern smartphones shoot remarkably high-quality video, but understanding fundamental camera settings separates amateur-looking footage from professional results regardless of your equipment.
Essential Camera Settings
Frame Rate: Stick with 24fps for a cinematic look or 30fps for standard video. Higher frame rates (60fps, 120fps) suit slow-motion footage but create unnecessarily large files for normal playback.
Resolution: 1080p (1920×1080) remains perfectly acceptable for YouTube, though 4K (3840×2160) provides flexibility for cropping and reframing in post-production. Most viewers watch on devices where the quality difference is imperceptible.
Shutter Speed: Follow the 180-degree rule—set shutter speed to double your frame rate (1/50s for 24fps, 1/60s for 30fps). This creates natural motion blur that makes movement appear smooth.
Aperture: Lower f-numbers (f/1.8, f/2.8) create background blur (bokeh) that emphasizes the subject. Higher f-numbers (f/5.6, f/8) keep more of the frame in focus, better for tutorials showing detail.
ISO: Keep as low as lighting allows (100-400) to minimize grain. Increase only when necessary in low-light situations.
Composition and Framing Principles
The rule of thirds remains the most universally applicable composition guideline. Imagine your frame divided into a 3×3 grid and position your subject along these lines or at their intersections rather than dead center. This creates more dynamic, visually interesting compositions.
Headroom and looking space: Leave moderate space above the subject’s head (too much looks awkward, too little feels cramped). When the subject looks or moves to one side, provide more space in that direction.
Camera height: Position the camera at eye level or slightly above for flattering angles. Shooting from below creates an unflattering look; shooting from too far above makes subjects appear diminished.
Background considerations: Clean, uncluttered backgrounds keep focus on the subject. Adding depth—spacing between subject and background—creates professional separation, especially when combined with wider apertures.
Basic Cinematography Principles
Cinematography elevates content from functional to engaging through intentional visual storytelling. You don’t need film school training, but incorporating basic principles dramatically improves production value.
Camera Movement with Purpose
Static shots work perfectly well for most YouTube content, but strategic movement adds visual interest:
- Slow, subtle movements: Gentle pushes (dolly in) create emphasis; pulls (dolly out) reveal context.
- Pans and tilts: Move smoothly to follow action or reveal information.
- Avoid unnecessary movement: Random handheld shake or unmotivated zooms look amateurish.
Affordable sliders ($50-150) provide smooth horizontal movement. Gimbals ($100-400) stabilize handheld shots for vlogs and demonstration content.
Visual Variety Through Shot Sizes
Cutting between different shot sizes maintains viewer engagement:
- Wide shots: Establish location and context.
- Medium shots: Standard for most talking-head content.
- Close-ups: Emphasize emotion, detail, or important information.
- B-roll: Supplementary footage that illustrates what you’re discussing.
Planning 2-3 different angles for the same scene provides editing flexibility and visual variety that retains attention.
Color and Visual Consistency
Maintaining consistent visual style across videos strengthens brand recognition:
- Color grading: Apply subtle color adjustments that create mood (warm tones feel inviting; cool tones feel professional and technical).
- Consistent framing: Use similar composition across videos in the same series.
- Visual branding: Incorporate consistent backdrop elements, colors, or styling that become associated with your channel.
Critical On-Camera Presentation Skills
Technical excellence means nothing without engaging on-camera performance. Presentation skills for YouTubers differ significantly from public speaking or acting—they require conversational authenticity while maintaining energy and clarity.
Developing Your On-Screen Presence
On-screen presence isn’t innate charisma; it’s a learnable skill built through specific techniques and consistent practice.
Authenticity vs. Performance
The most successful YouTubers find the balance between their natural personality and performance energy. Viewers connect with genuine individuals, not characters, but everyone naturally speaks more quietly and with less expression when alone than when engaged in animated conversation.
Effective on-camera presence involves amplifying your natural self by approximately 20-30%. Gesture slightly larger, speak slightly more expressively, and maintain slightly more energy than normal conversation. This compensates for the energy loss inherent in mediated communication.
Managing Camera Nervousness
Nearly every creator experiences camera anxiety initially. The sensation of talking to an inanimate object feels unnatural. Strategies that reduce this discomfort include:
- Imagining a specific person: Visualize talking to a friend interested in your topic.
- Starting with scripted content: Gradually transition to looser frameworks as comfort grows.
- Reviewing footage clinically: Watch playback with a focus on improvement rather than self-criticism.
- Recording multiple takes: Knowing you can re-record reduces pressure on any single attempt.
Anxiety typically diminishes significantly within the first 10-15 videos as the process becomes familiar.
Finding Your Natural Cadence
Speech patterns change dramatically when reading scripts versus speaking conversationally. Scripted delivery often becomes stiff and monotonous without conscious effort.
Techniques for natural-sounding delivery:
- Bullet points over full scripts: Know your points thoroughly, but speak them fresh each take.
- Mark pauses: Build intentional pauses into scripts for emphasis and natural breathing.
- Vary sentence structure: Mix short punchy statements with longer explanatory sentences.
- Use conversational language: Write how you speak, not how you write formally.
Voice Modulation and Pacing
Vocal delivery carries enormous emotional weight. The same words delivered with different pacing, tone, and inflection create entirely different viewer experiences.
Pace and Rhythm
New creators typically fall into two extremes: racing through content anxiously or speaking so slowly that they lose momentum. Neither retains viewers effectively.
Optimal pacing varies by content type:
- Educational content: Slightly slower allows processing complex information.
- Entertainment content: Faster maintains energy and excitement.
- Product reviews: Moderate pace balances thoroughness with engagement.
Within any video, varying pace prevents monotony. Speed up during less critical information; slow down for key points you want viewers to remember.
Strategic Pauses
Silence feels uncomfortable to new creators who often fill every moment with words or filler sounds (“um,” “uh,” “like”). Strategic pauses actually enhance communication:
- After questions: Give viewers a moment to mentally respond before you answer.
- Before important points: Brief silence focuses attention on what follows.
- For emphasis: Pausing after significant statements allows them to resonate.
Professional presenters use approximately 15-20% more pauses than typical conversation, but each pause is brief (1-2 seconds).
Vocal Variety
Monotone delivery—consistent pitch, volume, and tempo—creates listening fatigue. Vocal variety maintains engagement through:
- Pitch changes: Naturally rise when asking questions; drop slightly for serious points.
- Volume variation: Slightly softer for intimate information; stronger for enthusiastic emphasis.
- Tonal shifts: Match emotional content (excitement, concern, curiosity) with appropriate vocal tone.
Body Language and Movement
Non-verbal communication profoundly impacts how viewers receive your message. Research in communication theory suggests that body language contributes more to overall message interpretation than words alone.
Posture and Positioning
Confident, open posture establishes credibility:
- Sitting: Keep shoulders back, chest open, avoid slouching or leaning heavily on the desk.
- Standing: Distribute weight evenly, avoid swaying or shifting excessively.
- Angle to camera: Slight angle (10-15 degrees off center) often appears more natural than perfectly straight-on positioning.
Hand Gestures
Natural hand gestures enhance communication by:
- Illustrating size and scale: Showing dimensions with hands.
- Indicating direction: Pointing to where viewers should look (though avoid pointing directly at camera).
- Emphasizing points: Natural emphasis gestures that align with verbal stress.
Hands within the frame (chest to waist level) create the most natural appearance. Hands completely out of frame or constantly in pockets appear stiff; wild gestures above head level or outside the frame become distracting.
Facial Expressions
Face and particularly eyes carry enormous communicative weight:
- Match content emotionally: Serious expressions for serious topics; enthusiasm for exciting information.
- Avoid “dead face”: Expressionless faces signal boredom or discomfort even when discussing interesting content.
- Natural reactions: Subtle reactive expressions (raised eyebrows, slight smiles) create conversational feeling.
Eye Contact and Engagement
The camera lens represents your viewer’s eyes. Consistent, natural eye contact with the lens creates the intimate connection that builds loyal audiences.
Technical Eye Contact Considerations
- Lens height: Position the camera lens at eye level so you look straight into it rather than up or down.
- Monitor placement: If using a monitor for reference, place it directly beneath or beside the lens to minimize eye movement.
- Teleprompter solutions: Affordable smartphone teleprompter rigs ($30-100) place text directly in front of the lens.
Natural Eye Contact Patterns
Maintaining 100% eye contact feels intense and somewhat unnatural. In normal conversation, people glance away briefly while thinking. Incorporating occasional brief looks away—then returning to the camera—actually creates more natural connection than unbroken staring.
Breaking eye contact works when:
- Gathering thoughts: Natural pause while considering how to phrase something.
- Referencing something: Looking toward what you’re discussing.
- Demonstrating: Looking at objects you’re showing.
Return eye contact to the camera within 2-3 seconds to maintain connection.
Building Your Production Workflow
Consistent quality requires systematic workflow rather than relying on inspiration or memory. Professionals use checklists and standardized processes that ensure nothing gets overlooked.
Pre-Production Checklist
- Research and outline content thoroughly.
- Write script or detailed bullet points.
- Prepare props, products, or demonstrations.
- Check and charge all equipment batteries.
- Clear and prepare filming location.
- Set up lighting and test exposure.
- Position microphone and test audio levels.
- Frame shot and verify focus.
- Clear camera memory card.
Production Best Practices
- Record several seconds of silence at the beginning for noise reduction reference.
- Slate each take (state take number on camera) to simplify editing.
- Record multiple takes of challenging sections.
- Capture B-roll relevant to content.
- Review footage before disassembling setup to confirm you captured everything needed.
Post-Production Workflow
- Organize footage: Create clear folder structure before importing.
- Rough cut: Assemble best takes into sequence without detailed editing.
- Fine cut: Trim precisely, add B-roll, improve pacing.
- Audio mixing: Balance levels, add music, apply processing.
- Color correction: Match clips, adjust exposure and color.
- Graphics and text: Add titles, captions, graphics.
- Final review: Watch completely, checking for errors.
- Export: Use YouTube-optimized settings (H.264, recommended bitrate for your resolution).
Common Mistakes and How to Avoid Them
Learning from others’ mistakes accelerates your development. These issues appear consistently among struggling channels:
Inconsistent Upload Schedule
The YouTube algorithm favors channels that publish consistently. Irregular uploads prevent the audience-building momentum necessary for growth. Start with a realistic schedule (weekly or biweekly) you can maintain indefinitely rather than burning out attempting daily uploads.
Neglecting Audio Quality
Creators often invest heavily in cameras while using built-in microphones that sabotage their production. Audio equipment deserves equal budget priority to visual equipment.
Excessive Jump Cuts
While editing out pauses and mistakes improves pacing, excessive jump cuts create jarring viewing experiences. Aim for cuts every 5-10 seconds maximum rather than every 1-2 seconds.
Poor Thumbnail and Title Strategy
Excellent content with weak thumbnails and titles won’t attract viewers. These elements deserve serious attention and testing. Study successful channels in your niche and note patterns in their thumbnail design and title structure.
Ignoring Analytics
YouTube Studio provides detailed data about what works and what doesn’t. Regularly review:
- Audience retention graphs: Identify exactly where viewers lose interest.
- Traffic sources: Understand how viewers find your content.
- Demographics: Know who watches to better serve their interests.
- Click-through rate: Gauge thumbnail and title effectiveness.
Comparing to Established Creators
Comparing your tenth video to someone’s thousandth video creates discouragement. Every successful creator produced mediocre early content. Focus on improving each video compared to your previous work rather than matching channels that have years of experience.
Key Takeaways
-
- Technical quality directly impacts viewer retention and algorithmic performance. Invest in proper lighting and audio before expensive cameras.
- Three-point lighting creates professional-looking footage with affordable equipment. Color temperature consistency prevents unnatural color casts.
- Audio quality matters more than video quality to viewer retention. Proper microphone selection and placement are essential.
- Camera settings and framing follow established principles that create professional-looking results regardless of equipment cost.
- On-camera presence is learnable, not innate. Amplify your natural personality by 20-30% and practice consistently.
- Vocal delivery, pacing, and strategic pauses maintain engagement and emphasize important information.
- Body language and eye contact with the lens create connection with viewers and establish credibility.
- Systematic workflow and checklists ensure consistent quality and prevent oversights.
- Common mistakes include inconsistent uploads, poor audio, weak thumbnails, and ignoring analytics.
- Improvement comes through consistent practice and analytical review of what works, not comparison to established creators.
Frequently Asked Questions
What camera should I buy as a beginner YouTuber?
Start with whatever camera you currently own, including your smartphone. Modern smartphones shoot excellent 1080p or 4K video that’s perfectly adequate for YouTube. Once you’ve published 10-20 videos and identified your specific needs, consider dedicated cameras. For talking-head content, Sony ZV-E10 or Canon M50 Mark II offer excellent value. For vlogging, compact options like DJI Osmo Pocket or GoPro provide stabilization and portability. Invest in lighting and audio first—they impact quality more dramatically than camera upgrades.
How do I sound more confident on camera?
Confidence comes primarily from preparation and practice. Know your content thoroughly enough to discuss it without relying heavily on scripts. Record yourself regularly until the process feels routine rather than stressful. Watch your footage objectively to identify specific improvements rather than general self-criticism. Many creators find speaking to an imagined specific person rather than a faceless audience reduces anxiety. Remember that every successful creator felt uncomfortable initially—the feeling diminishes significantly within your first 15-20 videos.
What’s the minimum lighting setup I need?
The absolute minimum is one large, soft light source positioned at a 45-degree angle from your face. This could be a window with diffused natural light or a single LED panel ($40-80) with a diffusion panel. Adding a fill light on the opposite side (even a simple reflector bouncing the key light) dramatically improves results. A complete budget three-point lighting kit costs $150-250 and provides professional-quality illumination. Prioritize soft, diffused light over harsh direct light, and maintain consistent color temperature across all sources.
Should I script my videos word-for-word?
The ideal approach varies by content type and personal preference. Highly technical or educational content benefits from detailed scripts that ensure accuracy. However, fully scripted delivery often sounds stiff and unnatural without significant practice. Most creators find success with detailed bullet-point outlines that cover all necessary information while allowing natural conversational delivery. This approach combines thorough preparation with authentic presentation. Test both approaches and review which produces more engaging footage for your style.
How important is background blur (bokeh) in YouTube videos?
Background blur serves a specific purpose—separating the subject from the background to reduce visual distraction. It’s aesthetically pleasing but not essential for success. Many highly successful educational and tutorial channels use deep focus that keeps everything sharp. The key is ensuring your background doesn’t distract from the content whether through blur or through intentional staging with clean, minimal backgrounds. If shooting in cluttered environments, blur helps significantly. In controlled, clean spaces, it’s optional. Prioritize good lighting and clean composition over bokeh.
What microphone type works best for YouTube?
The best microphone depends on your filming situation. For stationary desk or talking-head setups, large diaphragm condenser mics (Audio-Technica AT2020, Rode NT1) or dynamic USB mics (Shure MV7, Rode PodMic) provide excellent quality. For movement or demonstrations, wireless lavalier systems (Rode Wireless Go II) maintain consistent audio. For vlogging, camera-mounted shotgun mics (Rode VideoMic) offer directional pickup. Avoid built-in camera microphones—even a budget $30 lavalier outperforms them significantly. Whatever type you choose, proper placement and quiet recording environment matter more than expensive equipment.
How do I improve viewer retention in my videos?
Viewer retention depends on both content and presentation. Strong openings (first 15-30 seconds) that immediately deliver value or intrigue prevent early drop-off. Pacing matters enormously—cut pauses and tangents ruthlessly while maintaining natural flow. Visual variety through B-roll, graphics, and shot changes maintains interest. Audio quality keeps viewers from leaving frustrated. Review your retention graphs in YouTube Analytics to identify exact moments where viewers leave, then analyze what changed (did the topic shift? did pacing slow? did audio or visual quality drop?). Pattern recognition from this data guides specific improvements.
Conclusion
Building a successful YouTube channel requires developing two distinct skill sets that work in concert. Technical skills—lighting, audio, camera operation, and editing—establish the professional baseline that modern viewers expect. On-camera skills—presence, vocal delivery, body language, and engagement—create the human connection that transforms casual viewers into loyal subscribers.
Neither skill set comes naturally to most people. You won’t master three-point lighting or confident on-camera delivery from reading a guide. These abilities develop through consistent practice, analytical review of your footage, and incremental improvement with each video.
The encouraging reality is that every successful creator started with awkward, technically imperfect videos. The difference between those who succeeded and those who gave up wasn’t initial talent—it was persistence and systematic improvement. Focus on making each video slightly better than the previous one rather than comparing yourself to creators with years of experience.
Start with the fundamentals: good lighting, clear audio, stable framing, and authentic on-camera presence. Master these basics before pursuing advanced techniques. A well-lit, clearly audible video with genuine presentation will outperform technically complex production with poor fundamentals.
The YouTube landscape continues evolving, but the principles outlined here remain constant. Viewers respond to quality production that serves compelling content delivered by authentic, engaging creators. Develop these skills consistently, and you’ll build the technical and creative foundation that supports sustainable channel growth.
Your first video won’t be perfect. Neither will your tenth. But each video you publish teaches lessons that inform the next, creating a compound improvement curve that eventually produces the quality you envision. Start now, commit to the process, and trust that competence comes through doing.